Financial Histories
OVERVIEW:
The Financial History screen displays all information related to a client's account. In some billing/accounting programs this is referred to as a ledger. DELPHI32 is based on the Open-Item Accounting concept, which simply means that any payment and/or adjustment applied to a client's account is specifically applied to individual sessions of that account. Since we take the extra time to accurately apply payments and adjustments to the sessions they belong to, the Financial History is the "payoff" by clearly and visually presenting this information in an easy to understand format.
In addition, the Financial History screen is customizable. This allows you to view patient account summaries in a manner that makes sense to you. After selecting your favorite view, DELPHI32 will remember your settings and use them as the default display for future financial histories.
Before using this feature, you need to have something to look at. Therefore, this feature only makes sense after you have recorded some sessions, applied payments, and made any adjustments to a client's account.
HOW TO GET THERE:
1) Start at the Main screen.
2) Highlight the client in the list you want to view a Financial History for.
3) Click on the Financial History (F6) button located on the right side of the screen. A Financial History screen similar to the one below will be displayed. Note: The first time you view this screen, it will probably look different from the one below. The instructions that follow allow you select multiple views to display the information the way that makes the most sense to you.
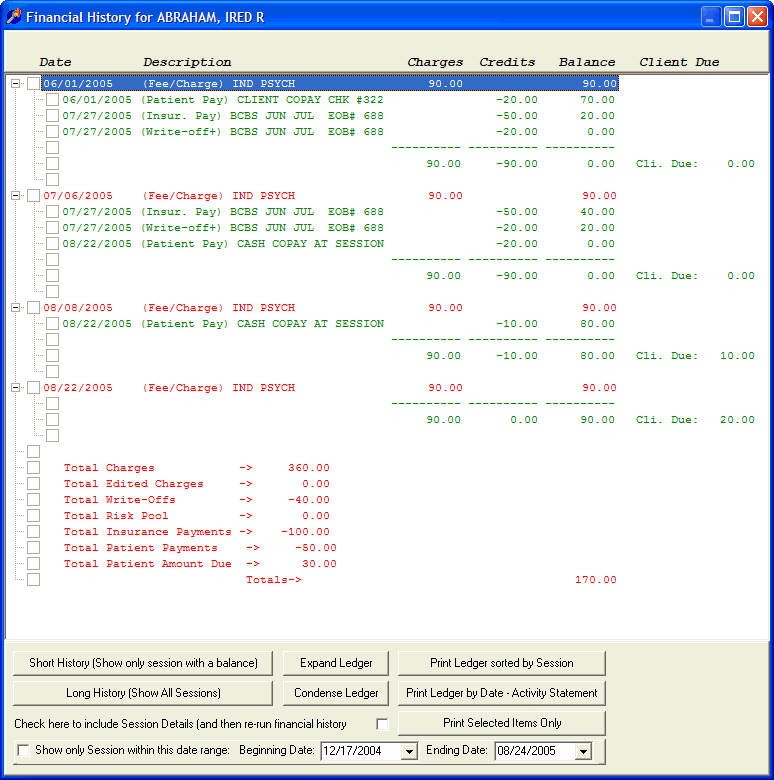
The screen above shows an "Expanded" - "Long History". In this case, the client has four sessions.
The first session (06/01/2005) has a $20 co-payment received at the time of the session, along with a $50 BCBS payment with a $20 write-off that was received 7/27.
The second session (07/06/2005) has the same insurance payment of $50 with a $20 write-off against it received on 7/27, along with a co-payment of $20 made on 8/22. Note: The insurance payment received on 7/27 was actually for $100 and it covered both the first and second session.
The third session has no insurance payments or adjustments, but it does have $10 dollar co-payment that was received on 8/22. Note: Although the co-payment was received on 8/22, it actually totaled $30 and was applied against the second and third sessions. Perhaps the client forgot their co-payments until they came back for the visit on 8/22 and then they only had $30 cash available to pay for their unpaid co-payments. The decision, in this case, was to pay $20 against the second session, and the remaining $10 to the third session.
The fourth session has nothing paid against it.
The bottom of the screen provides various totals.
The advantage of this screen is that you can see EXACTLY what was paid against each session with both the TOTAL balance due as well as the CLIENT balance due. If the client later asks why they owe you $30 dollars, you can quickly obtain the answer.
INSTRUCTIONS:
The bottom of the Financial History screen contains several buttons that allow you to view the information in different ways. Selecting a combination of several buttons provides additional flexibility. Each button is described below:
Short History - The short history shows only those sessions that have a balance due. This greatly reduces the amount of information you have to page through when answering questions. Example: You have 100 sessions with a client and 97 of those have been paid off. With the Short History you will see only the three sessions left that haven't been paid.
Long History - The long history displays every session that has ever occurred along with all associated transactions. If the client has many sessions, paid off or not, this report will be many pages long.
Expand Ledger - To the far left of each session line is a box with either a + (plus) or - (minus) sign in it. By clicking on this box you can toggle between an expanded (where you see all payments and adjustments made) or condensed (where you see only the charge) view of each session. Instead of manually clicking on each individual session separately, the Expand Ledger button will expand all sessions for you automatically.
Condense Ledger - To the far left of each session line is a box with either a + (plus) or - (minus) sign in it. By clicking on this box you can toggle between an expanded (where you see all payments and adjustments made) or condensed (where you see only the charge) view of each session. Instead of manually clicking on each individual session separately, the Condense Ledger button will condense all sessions for you automatically.
Check here to include Session Details - Checking this box and then selecting either Long or Short History, will show additional session details such as procedure code, diagnosis, provider of service, and Days/Unit under the associated session.
Show only session within a date range - You may choose to display only those sessions that have occurred within a specific date range. For example, show only sessions occurring last year. Check this box and then enter the date range.
Print Ledger sorted by Session - This will print an exact copy of the Financial History screen as shown at the time you press this button. This takes into consideration any settings you selected above.
Print Ledger by Date - By selecting this button you will print a detailed, chronological listing of all transactions sorted by date (NOT SESSION). This is the same type of report that can be generated by a detailed Activity Report and also includes the providers name and address as well as the client's name and address.
Print Selected Items Only - To the left of each line item on your Financial History screen is a box. If you click on the box it will be selected (have a check mark in it). Occasionally, you may want to include and/or exclude specific line items from a printed version of the Financial History. When you select this button it will print only those line items that have been selected. This can be useful if a client wants to see some specific information without all of the extra details that might be associated with their account.
Additional features:
You have the option to include or exclude the Progress Notes associated with each session on the Financial History and on statements. This is selected through the Accounting Setup screen under the Setup menu.
You have the option to include or exclude Special Notes (those made at the time of entering payments and/or adjustments) on the Financial History and on statements. This is selected through the Accounting Setup screen under the Setup menu.
| Browser Based Help. Published by chm2web software. |