Client Payments
OVERVIEW
This section provides instructions for applying payments received from clients. Client payments can be applied to the client's account by two different methods. The instructions below use the Payment screen and are used the majority of the time. Alternatively, a single payment received at the time of the session and paying for just that session can be applied while Recording a Session.
The amount received from the client can be either a single payment paying for one session, or a larger payment spanning multiple sessions. (See Open Item Accounting)
HOW TO GET THERE
1) At the Main screen.
2) Highlight the client in the main client list that you want to make a payment for.'
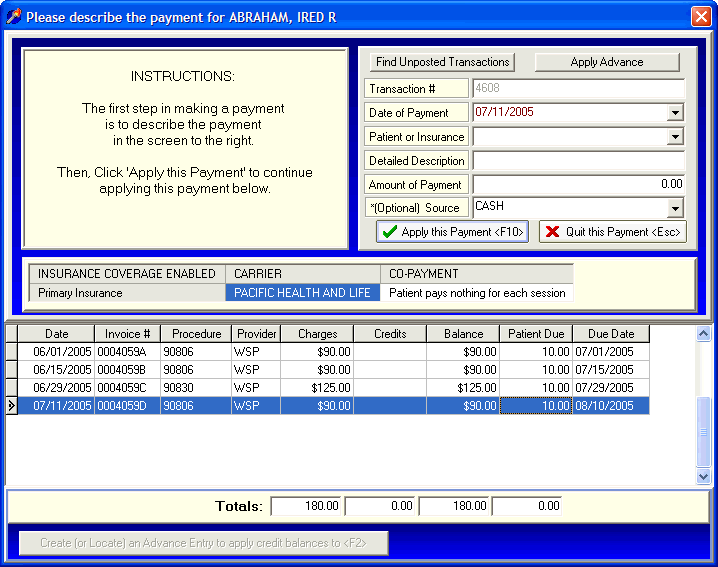
3) Click on the 'Payments' button (F4) located on the right side of the screen. A screen, similar to the one below, will be displayed.

INSTRUCTIONS
Recording a payment from the 'Payment' screen is a two-step process. First, you will provide the details of the payment in the upper portion of the screen. Secondly, you will apply that payment against one or more session located in the lower portion of the screen.
The first step of describing the payment in the upper screen is described first.
Transaction # - The transaction number is assigned automatically by DELPHI32 and is used internally for record-keeping purposes. You cannot edit this number.
Date of Payment - Enter the date you received this payment. You may click on the drop-down menu to select a date from the calendar. Dates are entered in the format MM/DD/YYYY.
Patient or Insurance - Click on the drop-down menu. Your choices are 'CLIENT' or 'INSURANCE.' In this case, select 'CLIENT.' You can also type either "C" or "I" and your choice will appear.
Detailed Description - Provide a detailed description of this payment. This description will ultimately prove extremely useful when printing Statements and viewing Financial Histories. Take an extra few seconds to enter a description that will be meaningful. Examples might include: Client Check #1234, Cash co-pay, or anything else that accurately describes the source of the payment.
Amount of Payment - Enter the total amount of the payment. This amount might be a single payment for an individual session or a larger payment covering several sessions.
*(Optional) Source - This is not required but may prove useful if you would like to further classify the sources of your payments for report building later. The drop-down menu can be modified to include any payment source that you find useful. Instructions for modifying this Payment Source list can be found in the section labeled Payment Source Setup.
Once you have described the payment in the upper screen, click on the "Apply this Payment (F10)" button.
The focus of the screen now shifts to the lower section of the screen where the sessions for the client are located.
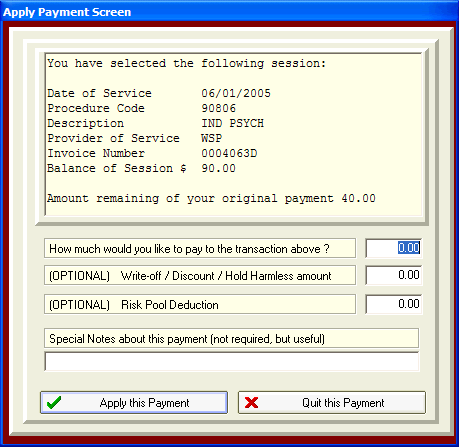
At this point, double-click on the session that you want to make the payment against. In this example, we are double-clicking on the first session that will display the 'Apply Payment' screen shown below.

How much would you like to pay to the transaction above ? - The first box is asking you how much of the total payment amount (entered in the upper screen) would you like to apply towards this session?
(OPTIONAL) Write-Off / Discount / Hold Harmless amount - The second box allows you to take a write-off against this session. This is not common for client payments but if you decide to "discount" a client's payment amount you can use this field. When applying insurance payments, it is quite common that the insurance carrier will force you to reduce or write off a portion of your normal fee. This is described in more detail in the section on Discounts / Write-Off's / Hold Harmless and Insurance Payments.
Special Notes about this payment (not required, but useful) - The last line allows you to enter any special notes related to this specific payment. An example of a special note might be 'Thank You for your payment.' DELPHI32 provides the ability to include or exclude the special notes from the client Statements and Financial Histories which is selected in the Accounting screen under the Setup menu. If you use these notes for internal purposes, you probably don't want them to appear on statements. If you use them as friendly reminders, you have the option to include them on various reports and statements throughout DELPHI32.
When you are finished with the 'Apply Payment Screen', click on the ![]() . Several different things may occur at this point.
. Several different things may occur at this point.
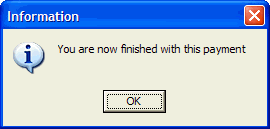
If the amount you applied against the session was equal to the total amount of payment entered in the upper part of the screen, you payment is complete and DELPHI32 will display the following message. 
If the total amount of the payment entered in the upper screen was $30, and you applied $10 against a particular session, the total amount of payment remaining to be applied will now read $20 in the upper screen. At this point, you would double-click on a different session and say apply $10 against it. After applying the second $10, the amount of payment remaining in the upper screen will read $10. Basically, this allows you to distribute a larger payment across multiple sessions. After applying the final $10 dollars against a third session, your payment will be done and DELPHI32 will display the message below.