Insurance Queue
OVERVIEW
This section provides instructions for batch printing CMS/HCFA claim forms or creating batches of electronic claims. Instructions for generating individual insurance claims can be found in the Session History section.
Batch printing of insurance claims takes place in the Insurance Queue (pronounced like the letter 'Q'.) Each time you Record a Session, DELPHI32 places the session into the insurance queue. The queue is simply a temporary holding area for each new session that is recorded. For example, assume you have five clients in your practice and you see each of them once per week. If you look in the insurance queue at the end of the month, there will be five bills (one for each client) with four sessions on each bill. At this point, you would select all of the pending claims in the queue, print them, and then delete them (assuming they printed correctly.) Now when you record sessions into the computer, those sessions will be placed in the queue for printing when your billing cycle is complete.
HOW TO GET THERE
1) Start at the Main Menu.
2) Select the `Setup' menu.
3) Scroll down and highlight `Insurance Queue.
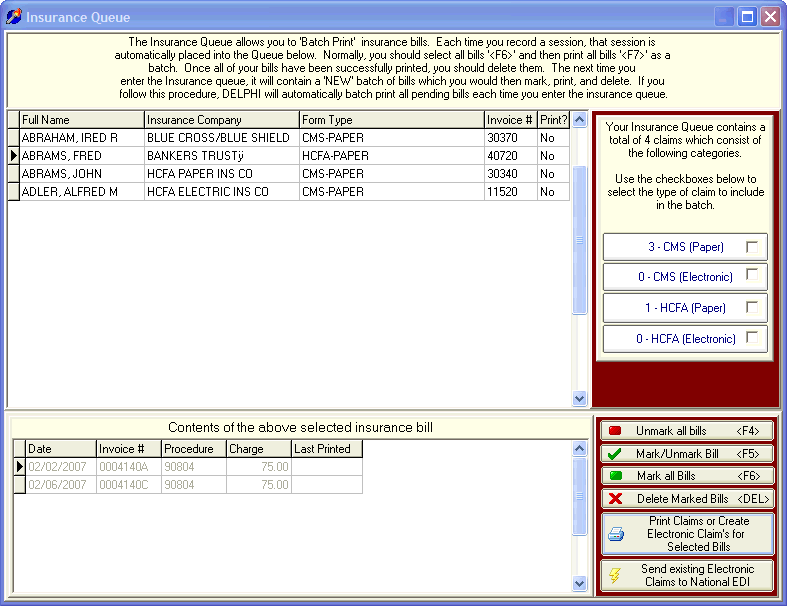
4) The 'Insurance Queue' screen, similar to the one below, will be displayed.

INSTRUCTIONS
You'll notice that the screen is separated into two sections. The upper section lists the claims that are ready to be printed or have an electronic claim sent. This section lists the name of the client, their insurance company, the type of form used, the invoice number assigned to the claim and a column telling you if the claim has already been printed.
The bottom half of the screen shows you the dates of service that will be printed for each currently selected item. If you notice there is a mistake, let's say the date of service was entered wrong - you must go back to the Session History screen to make the correction.
The first step of using the 'Insurance Queue' is to select the claims you want to process. If you have a mixture of different claim form types you will need to use the four buttons located at the right side of the screen. These buttons allow you to select one type of claim form at a time to include in your batch.
Another method for selecting individual claims is to simply click on it in the upper section of the screen. This will change the color of the selected claims to white text on a green background. Clicking on it again will unselect that claim.
Once you have selected the type of claims to include in the batch, you should then click on the button 'Print claims or create Electronic Claims for Selected Bills' button. You will get a message telling you how many claims you have selected so you can load that number of claims into your printer. See the view of this screen below.
If the claims you selected are being sent electronically you will get a message stating that you're submitting electronic claims, and when you select 'YES' it will bring up a screen where you will enter the file name that the electronic claims will be sent to for transmitting to National EDI. See the Electronic Claims Overview section for further information.
Once you've made sure that the claims were processed correctly, select the 'Delete Marked Bills.' The claims just processed will be deleted from the Insurance Queue. This will ensure that when new sessions are recorded, the queue will be empty and awaiting new sessions.
If you want to select all of the claims in the upper portion of the screen at one time you can click on the button to lower right side of the screen entitled 'Mark all Bills.' This will select all the claims at one time, you can select the 'Print Claims or create Electronic Claims for Selected Bills' button and then continue as described above.
If you select all the claims for processing and then decide that is not what you wanted, you can select the button 'Unmark all Bills' and start all over with the selection process.